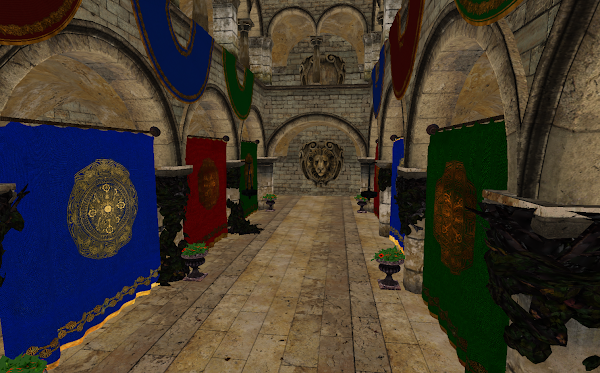
Scene rendering
Now with the shaders compiled, vertex layout configured and descriptor set layouts specified, the rendering can begin. In a similar way as with the single triangle, you need to record draw calls. But this time a draw call per mesh will be recorded. Each draw call will automatically use the descriptor set of the individual material from the given mesh. But push constants as well as additional descriptor sets need to be configured in a callback if used (in the example here only the push constants get filled with individual data):
auto recordMesh = [](const glm::mat4& mvp,               // mvp matrix of mesh
                     const glm::mat4& model,             // model matrix of mesh
                     vkcv::PushConstants& pushConstants, // push constants
                     vkcv::Drawcall& drawcall            // draw call
) {
  // append contents of the push constants for each draw call
  pushConstants.appendDrawcall(mvp);
};

// record draw calls for the whole scene
scene.recordDrawcalls(
  cmdStream,                       // command stream
  cameraManager.getActiveCamera(), // active camera

  renderPass,        // render pass
  gfxPipeline,       // graphics pipeline

  sizeof(glm::mat4), // size of the push constants per mesh
  recordMesh,        // callback to configure each draw call

  // render targets to attach as image handles
  {
    swapchainInput,  // swapchain image
    depthBuffer      // depth buffer
  },

  windowHandle       // window handle
);
When recording draw calls of the scene, the render targets are passed as image handles and the size of the push constants gets specified in an amount per draw call (or per mesh). In case you create your own scene for rendering in 3D software like Blender for example, you might be wondering how meshes will only have one material?
The answer to this question is that meshes get split into different parts depending on their material when converting the scene into a GLTF file. The scene module splits meshes into so called mesh-parts as well. Therefore the callback passed to configure each draw call will actually be called per mesh part to be exact. But since that's an edge case, the naming here is simplified.
With all code pieces of the tutorial in place, we get the following program (about 130 lines of code in the main.cpp file):
#include <vkcv/Core.hpp>
#include <vkcv/Pass.hpp>
#include <vkcv/shader/GLSLCompiler.hpp>
#include <vkcv/camera/CameraManager.hpp>
#include <vkcv/scene/Scene.hpp>

#include <glm/glm.hpp>

int main(int argc, const char** argv) {
  const std::string applicationName = "My application";

  vkcv::Core core = vkcv::Core::create(
    applicationName,
    VK_MAKE_VERSION(0, 0, 1),
    { vk::QueueFlagBits::eGraphics, vk::QueueFlagBits::eTransfer },
    { VK_KHR_SWAPCHAIN_EXTENSION_NAME }
  );

  const int windowWidth = 800;
  const int windowHeight = 600;
  const bool isWindowResizable = true;

  vkcv::WindowHandle windowHandle = core.createWindow(
    applicationName,
    windowWidth,
    windowHeight,
    isWindowResizable
  );

  vkcv::Window& window = core.getWindow(windowHandle);

  vkcv::scene::Scene scene = vkcv::scene::Scene::load(
    core,
    std::filesystem::path("assets/Sponza/Sponza.gltf"),
    {
      vkcv::asset::PrimitiveType::POSITION,
      vkcv::asset::PrimitiveType::NORMAL,
      vkcv::asset::PrimitiveType::TEXCOORD_0
    }
  );

  vkcv::PassHandle renderPass = vkcv::passSwapchain(
    core,
    window.getSwapchain(),
    { vk::Format::eUndefined, vk::Format::eD32Sfloat }
  );

  vkcv::ShaderProgram shaderProgram;
  vkcv::shader::GLSLCompiler compiler;

  compiler.compileProgram(
    shaderProgram,
    {
      { vkcv::ShaderStage::VERTEX, "shaders/shader.vert" },
      { vkcv::ShaderStage::FRAGMENT, "shaders/shader.frag" }
    },
    nullptr
  );

  const auto vertexAttachments = shaderProgram.getVertexAttachments();
  vkcv::VertexBindings bindings;

  for (size_t i = 0; i < vertexAttachments.size(); i++) {
    bindings.push_back(vkcv::createVertexBinding(i, { vertexAttachments[i] }));
  }

  const vkcv::VertexLayout vertexLayout { bindings };
  const auto& material0 = scene.getMaterial(0);

  vkcv::GraphicsPipelineHandle gfxPipeline = core.createGraphicsPipeline(
    vkcv::GraphicsPipelineConfig(
      shaderProgram,
      renderPass,
      vertexLayout,
      { material0.getDescriptorSetLayout() }
    )
  );

  const auto swapchainInput = vkcv::ImageHandle::createSwapchainImageHandle();
  vkcv::ImageHandle depthBuffer;

  vkcv::camera::CameraManager cameraManager (window);

  auto camHandle = cameraManager.addCamera(vkcv::camera::ControllerType::PILOT);
  cameraManager.getCamera(camHandle).setPosition(glm::vec3(0, 0, 2));
  cameraManager.getCamera(camHandle).setNearFar(0.1f, 30.0f);

  core.run([&](const vkcv::WindowHandle &windowHandle,
               double t,
               double dt,
               uint32_t swapchainWidth,
               uint32_t swapchainHeight
  ) {
    if ((!depthBuffer) ||
        (swapchainWidth != core.getImageWidth(depthBuffer)) ||
        (swapchainHeight != core.getImageHeight(depthBuffer))) {
      depthBuffer = core.createImage(
        vk::Format::eD32Sfloat,
        vkcv::ImageConfig(
          swapchainWidth,
          swapchainHeight
        )
      );
    }

    cameraManager.update(dt);

    auto recordMesh = [](const glm::mat4& mvp,
                         const glm::mat4& model,
                         vkcv::PushConstants& pushConstants,
                         vkcv::Drawcall& drawcall) {
      pushConstants.appendDrawcall(mvp);
    };

    auto cmdStream = core.createCommandStream(vkcv::QueueType::Graphics);

    scene.recordDrawcalls(
      cmdStream,
      cameraManager.getActiveCamera(),
      renderPass,
      gfxPipeline,
      sizeof(glm::mat4),
      recordMesh,
      {
        swapchainInput,
        depthBuffer
      },
      windowHandle
    );

    core.prepareSwapchainImageForPresent(cmdStream);
    core.submitCommandStream(cmdStream);
  });
}
Sure, the result is not shaded as presented on this tutorials overview. But the fragment shader does not take advantage of having interpolated normals from your geoemtry yet. Happy coding!

